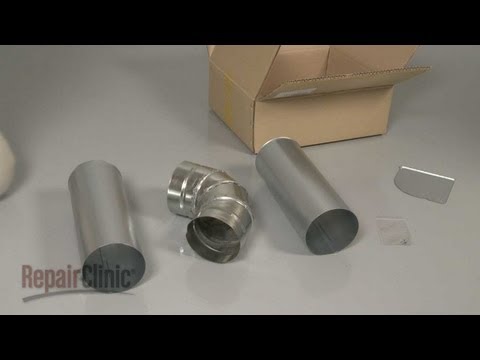
Repair clinic encourages you to follow this procedure safely. In this video, we will show one or more icons to alert you when to use caution. As with any repair, you should unplug the appliance before beginning. - To install a side venting kit in your dryer, first remove the screws securing the main top to the cabinet. Slide the top back and lift up to remove it. - Next, uninstall the screws securing the control panel. Lift up the tabs to detach the control panel from the support bracket and move it out of the way. - Remove the screws securing the support bracket, so you can detach it from the cabinet. Detach the door switch wire harness and remove the wire from the retainer. Set the bracket aside. - Open the dryer door and support the front panel as you remove the lower two screws to release it. Pull the panel forward and lift up to remove it. - Disconnect the light switch wire harness and the moisture sensor wire harness. Remove the screws from the front bulkhead mounting brackets. - Remove the screws securing the duct housing to the blower assembly. Lift the front bulkhead up and pull it forward to remove it. - Reach under the drum and push the idler pulley to release the tension on the belt. Pull the belt off of the motor pulley. You can use the belt to help lift out the drum. - Now, remove the rear panel screws securing the old venting to the blower housing and pull the old venting out. - Push out the appropriate venting hole cover to accommodate the new venting. Now, you're ready to install the side venting kit. - Slide the appropriate vent tube onto the blower housing outlet. Use the provided screw...
Award-winning PDF software


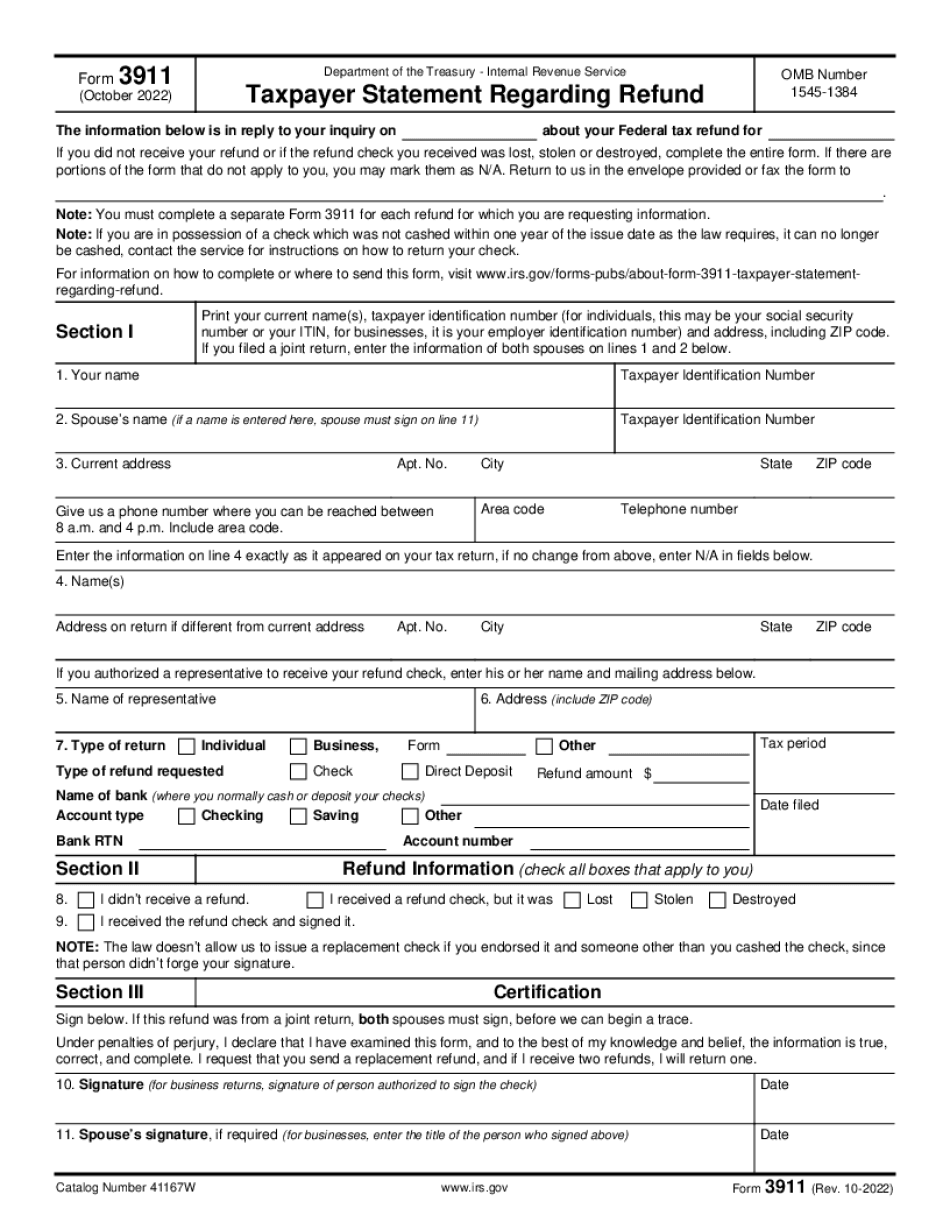
3911 Form: What You Should Know
You can track the status of a refund directly from the Department of Revenue website and the State's General Assistance (GA) site. State-based tax preparers like CT.com and CT.biz have similar features. Form 3911: Fill Out Online | Word — CT.gov Form 4150, Connecticut's New Self Employed Worker (SEW) Tax Credit Oct 19, 2018. Connecticut Department of Revenue. State of Connecticut. “ Connecticut's New Self Employed Worker (SEW) Tax Credit.” This article summarizes the information that is available on the Department's website. Dec 4, 2025 — The state of Connecticut recently issued regulations to establish the process for filing a Form 4150 tax application for an employer. The application must include all the following: A letter of permission from each employee/operator of the business, that must be received by the tax department by January 2, 2018, and by March 2, 2018. A signed copy of the tax return that the SEW will file for the taxable year. The employer's completed Form 4150. The signature of the applicant/operator and all employees. The rules are somewhat complex, but they are still rather easy. The applicant must fill out Form 4150, Connecticut's New Self Employed Worker (SEW) Tax Credit. The tax credit amount will be calculated using all the following information about employee, all the employee's spouse, and the employee's dependents: Payroll expenses and gross income. Employee's and spouse's wages, including any cash compensation received for any work performed or services provided. The amount that the employee and spouse paid to support themselves, their dependents, and their property. In this case, you can use your own calculations or use the IRS calculations. Family assets and other income. Amount of the gross income of the applicant. (Use the IRS method.) Total taxes paid for the taxable year that were subject to the Connecticut credit. Annual income, including all other income earned within the past four years and all employment income for the past twenty-one months. The tax credit should be in the amount shown on the Form 4150. When the applications are received, the tax department will assign the amounts of the tax credits to be paid to the applicants and the amount of the state tax credit will be paid to the applicants.
online solutions help you to manage your record administration along with raise the efficiency of the workflows. Stick to the fast guide to do Form 3911, steer clear of blunders along with furnish it in a timely manner:
How to complete any Form 3911 online: - On the site with all the document, click on Begin immediately along with complete for the editor.
- Use your indications to submit established track record areas.
- Add your own info and speak to data.
- Make sure that you enter correct details and numbers throughout suitable areas.
- Very carefully confirm the content of the form as well as grammar along with punctuational.
- Navigate to Support area when you have questions or perhaps handle our assistance team.
- Place an electronic digital unique in your Form 3911 by using Sign Device.
- After the form is fully gone, media Completed.
- Deliver the particular prepared document by way of electronic mail or facsimile, art print it out or perhaps reduce the gadget.
PDF editor permits you to help make changes to your Form 3911 from the internet connected gadget, personalize it based on your requirements, indicator this in electronic format and also disperse differently.
Video instructions and help with filling out and completing Form 3911